Thursday, June 7, 2012

Easy New Zealand Pavlova


I'm back!!!! Which means, yep, it's break time again. But this time, it's not just another break between terms. It's the end of freshman year. 

Oh how quickly this year at Dartmouth has gone by! I knew the time would fly, but sitting here on my bed at home, thinking I don't want to go back to the college bed, it really feels like it was only a few weeks ago when I arrived on the Green, a slightly nervous, but excited frosh.


The last three terms at college have truly been incredible. While people tend to hope that friends stay the same even after they go to college, I think that change can be good, and I would say that I've changed. First off, I don't care as much anymore. I guess that can be both good and bad, but let's just put it on the good list for now. I have more dreams, but also more doubts. Sometimes, I still think to myself "why am I learning this useless crap?" I'm a little smarter, at least in Chinese and economics (my knowledge of physics has definitely degraded), and I am more willing to take big leaps of faith.

Looking back on the last year, I've had many triumphs, and well, not-so-triumphant moments. Small achievements like doing the polar bear dive, i.e. jumping into a hole cut in a frozen pond, finding the perfect salad mix at Collis, and completing the Lou's challenge during Green Key are the things I will remember for the rest of my life. I've developed many great relationships, including my relationship with 1902 (the 24/7 study room in the library). We haven't had "the talk" yet, but we're pretty much exclusive. Oh, and I guess my friends are pretty awesome too.


It's funny, because this break, which is supposed to be my longest, will actually be my shortest. Tomorrow, I'm leaving, after only having stayed two days at home, for Beijing, where I will be studying abroad at Beijing Normal University with 23 other students from Dartmouth over the summer. It's been seven years since I last went to China, so I'm eager to go back and see how it's changed. I've actually started up a new blog just for this trip, so please follow http://eatingchina.wordpress.com/ to get a taste (literally! But not actually…sorry) of my experience as a foreign exchange student in China!

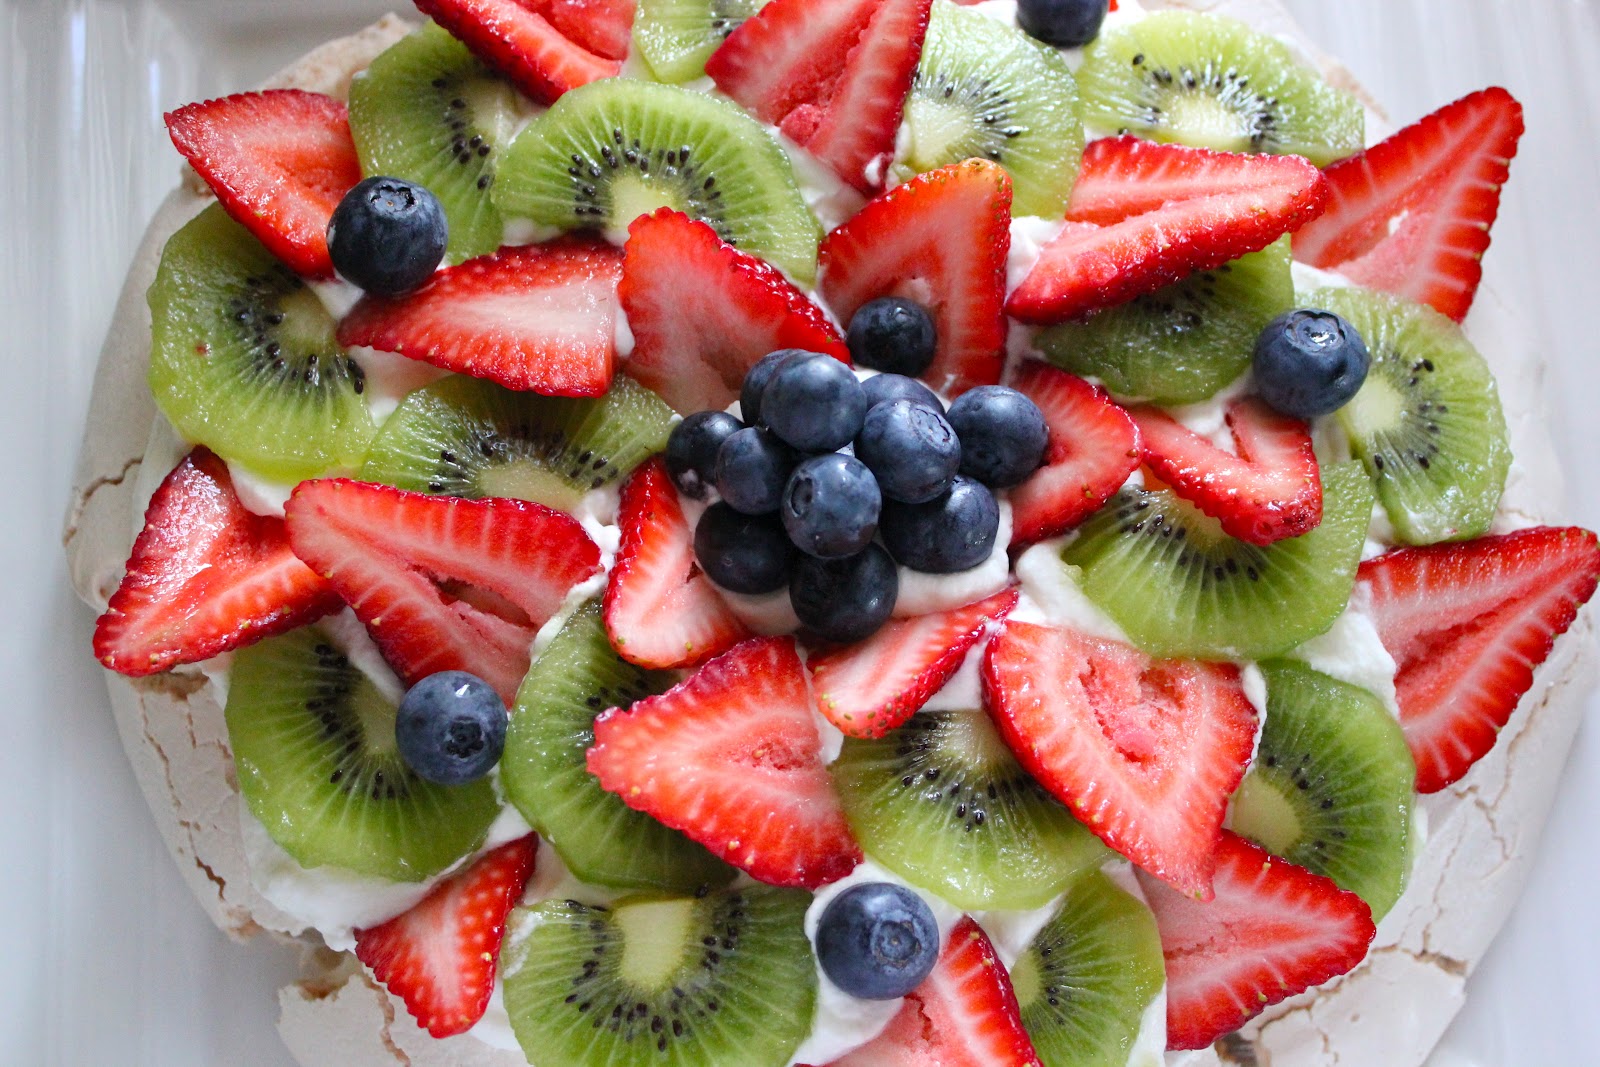
I decided to share a recipe for Pavlova, a New Zealand (not Australian, although the Aussies will tell you otherwise) dessert that is perfect for the summertime. The light meringue cake base, topped with whipped cream and fresh fruit is a beautiful sight and would be a welcoming addition to any summer BBQ!

Ingredients

4 egg whites
1/8 teaspoon cream of tartar
1 cup white sugar
1 tbsp cornstarch
1 tsp vanilla extract

1 pint heavy cream
¼ cup confectioner’s sugar
fresh fruit (I used kiwifruit, strawberries, and blueberries)

Directions
1. Pre-heat oven to 300 degrees F. Line a baking sheet with parchment paper.
2. In a large bowl, sprinkle cream of tartar over egg whites and beat with an electric beater until stiff.
3. Whisk together the sugar and cornstarch. Slowly add the mixture to the egg whites in batches, while beating on medium speed, until all is combined. The meringue should be shiny, white, and stiff. Gently fold in the vanilla extract.
4. Spoon mixture on the baking tray and smooth into an 8-inch dome.
5. Bake for 1 hour. Remove from oven and cool completely.
6. In a small bowl, beat heavy cream and confectioner’s sugar until stiff peaks form. Spoon whipped
cream over meringue, and top with fruit.


Tuesday, March 20, 2012

Flourless Almond Butter Cookies


What are your simple joys in life? I was on this subject during dinner the other day with a friend. It had been a stressful day with everyone studying for finals, and I was tired, frustrated, and hungry. But then, I had a delicious stir-fry with a good chat, and instantly felt much better. A good meal and some nice company after a tough day is just one of the many simple joys in life.


Considering everything that goes through a college student’s mind every day, it’s so easy to overlook the little things in life. Too often, we only look towards greater goals, and don’t pick up on the small successes everyday that make us smile that little bit more.

Sure achieving a long term goal feels great, but so does popping bubble wrap for hours on end, taking boots off after a long day of skiing, finally using the toilet after holding on for too long, being outside under the sun, itching a mosquito bite, spending carefree time with friends, enjoying a refreshing smoothie after a long run outdoors … and the list goes on.


I really hope you give this almond butter cookie recipe a try. These cookies are definitely a simple joy. With only five ingredients, you’d really have to quite the kitchen klutz to mess these up.

Ingredients

1 cup almond butter
1 cup brown sugar
1 large egg
1 tsp baking soda
½ tsp vanilla extract
Whole almonds (optional)

Directions

1. Preheat the oven to 350 degrees F.
2. Combine all the ingredients in a bowl and mix well. Use a tablespoon to scoop balls of the dough, and use your hands to form balls. Place on a lined baking sheet. Press an almond on top if desired. Bake for 10 minutes, or until golden brown. They will be soft when first out of the oven. Cool completely.


Saturday, March 17, 2012

Blueberry Scones with a Streusel Topping


Sometimes, my life is so boring (and my brain so dead) that I wonder, why do I even have a blog? I guess it’s so I can share the result of my cooking with the World Wide Web, but I also try to share a bit of my life too. Sorry I’ve got nothing else interesting to share today but this recipe and these photos. Hopefully, I’ll be in more of a writing mood tomorrow.


Ingredients

¾ cup dried blueberries
1 ¾ cup all-purpose flour
2 ½ tsp baking powder
2 tbsp white sugar
¼ cup butter (1/2 stick)
2 large eggs, beaten
1/3 cup milk

Streusel Topping:
2 tbsp brown sugar
2 tbsp all purpose flour
¼ tsp ground cinnamon
1 tbsp butter, cut into small pieces

Directions

1. Preheat oven to 425 degrees F.
2. Place dried blueberries in a small bowl and cover with hot water. Leave to soak for 5 minutes, then drain and pat dry with a paper towel.
3. In a large bowl, combine the flour, baking powder, and sugar. Cut in the butter with a pastry cutter (or use your hands) until the mixture resembles fine breadcrumbs.
4. Stir in the blueberries. Add in the beaten eggs and milk, and stir until the dough comes together.
5. On a lightly floured surface pat out the dough until ¾ inch thick. Use a biscuit cutter to cut it into rounds (or into triangles with a knife). Place on a lined cookie sheet. Brush tops with milk and sprinkle with streusel topping.
6. Bake for 15-20 minutes or until golden.

To make the streusel topping: combine sugar, flour, and cinnamon in a small bowl. With a pastry cutter (or your hands), cut in the butter until the mixture resembles breadcrumbs.


Thursday, March 15, 2012

Peanut Butter Truffle Brownies


Peanut butter and chocolate just might be one of the greatest pairings ever. When I first encountered a Reese’s peanut butter cup three years ago, I thought it was such an interesting combination of ingredients. Whoever came up with the idea to combine peanut butter and chocolate was a pure genius.

I was reminded of my love for pb and choc by my friend Jenny, who made peanut butter and chocolate cupcakes during finals period last week. In fact, I got a personal delivery to the library! A link to her blog and to the recipe can be found here.


I’ve recently become a frequent user of Pinterest. It’s such a cute website, full of stunning photography, crafty ideas, and beautiful creations of all sorts. I came across a pin for these peanut butter truffle brownies while getting my daily dose of Pinterest a few weeks ago, and I knew I just had to make them.

With a new camera in hand, I had lots of fun taking plenty of photos. Maybe I went overboard a little. Somehow, I managed to take over 80 pictures, making choosing which ones to post a difficult decision. Oh well. I’ve no one to blame but myself. Or my camera…

Ingredients

Brownie layer:
1 cup vegetable oil
2 cups white sugar
2 tsp vanilla extract
4 large eggs
1 cup all-purpose flour
2/3 cup unsweetened cocoa powder
1/2 tsp baking powder

Peanut butter layer:
1/2 cup butter (1 stick), softened
1/2 cup peanut butter
2 cups powdered sugar
2 tsp milk

Chocolate ganache layer:
¼ cup peanut butter
2 cups semisweet chocolate
¼ cup butter

Directions

1. Preheat oven to 350 degrees F. Grease a 13x9 inch baking pan.
2. First, make the brownie bottom. In a medium bowl, mix together oil, sugar, and vanilla. Beat in eggs. Combine flour, cocoa powder, and baking powder. Stir into the wet mixture until well blended. Spread batter into greased pan.
3. Bake for 25 to 30 minutes. Let the brownie cool.
4. While the brownie is cooling, make the peanut butter layer. Combine the peanut butter layer ingredients in a bowl and beat until smooth and creamy. Spread onto the cooled brownie. Place in the refrigerator for 30 minutes, or until the filling is set.
5. To make the ganache layer, combine peanut butter, chocolate, and butter in a glass bowl over a saucepan of simmering water (or use a double boiler). Melt the ganache ingredients together and stir to combine.
6. Spread over the peanut butter layer. Place in the refrigerator to set, approximately 30 minutes. Cut into squares to serve.


Wednesday, March 14, 2012

Healthy Waffles with Fresh Strawberries


…And that’s a wrap! On winter term that is. A few snow showers, too many Collis smoothies, and numerous floor movie nights later, here I am again, back home relaxing and blogging. I can’t believe I’m already two-thirds into with my freshman year at Dartmouth. As clichĂ© as it sounds, it seems like it was just yesterday when I was welcomed to my home away from home.

Back in Philly with the pantry fully stocked, I’m eager to begin experimenting in the kitchen again. I no longer have to ask the entire dorm for an egg, or resort to using only vegan recipes when my baking supplies are low.


I’ve always been a big fan of breakfast, but it’s difficult to get a healthy one in college when waking up before 9 is a tremendous feat. Most days, my breakfast just ends up being a granola bar and a cup of coffee. Sometimes, I crawl to our campus cafĂ© for a nourishing bowl of oatmeal; I hardly ever make it to the dining hall. This morning, I made these lite waffles for my sister right before she left for school. Yes, I had to wake up at 7am to do so. No more sleeping at 2 and waking up at 9 for me. I’m determined to have a healthy sleep schedule this spring break.

Ingredients

1 cup all-purpose flour
2 tbsp sugar
1 tsp baking powder
1/2 tsp baking soda
1 cup nonfat milk
1 tbsp lemon juice
1 tbsp vegetable oil
1 egg, lightly beaten
Cooking spray
Strawberries
Icing sugar (optional)
Syrup, agave nectar, or honey (optional)

Directions

1. In a large bowl, combine flour, sugar, baking powder, and baking soda. Make a well in the center.
2. Combine milk, lemon juice, oil, and egg. Add to the flour mixture and stir until smooth.
3. Spray waffle iron with cooking spray and follow the manual directions
4. Decorate with fresh strawberries. Dust with icing sugar and serve with syrup (or for a healthier alternative, agave nectar or honey) if desired.


Monday, December 19, 2011

Peppermint Pinwheel Cookies


Like red and green, and red and gold, red and white are just one of those Christmas color combinations that were meant to be. I mean, it’s obviously pretty important considering it’s the color of Santa’s outfit and the color of candy canes.

The idea of Santa is charming. A man who gives out presents by the sleighload? Well, if only. I can’t quite remember when I stopped believing in Santa. It must’ve been gradual, since I don’t remember sitting down with my parents and having the talk. I’m not sure if my eight-year-old sister still believes in Santa. I guess I’ll continue to play the role the older sister is supposed to play and just wait for some 5th grader to tell her the truth. I hope my sister will realize that just because Santa only exists in the mind, does not mean he’s not just as magical, especially if he can get kids to work harder in order to get on his nice list.


Ever wondered about the relationship between peppermint and Christmas? I’m surprised I haven’t actually. It’s just one of those accepted flavors that have become part of the holiday season, so who cares why? The point is that candy cane tastes delicious, and is a great addition to hot cocoa, cakes, and cookies, like these pinwheel cookies.

Ingredients

½ cup butter, softened
1 cup sugar
1 large egg
½ tsp vanilla extract
1 ¾ cups all-purpose flour
½ tsp baking soda
1 tbsp red food coloring

For the peppermint frosting:½ cup butter, softened
2 cups confectioner’s sugar
1 tsp peppermint extract
2 tbsp milk
1 crushed candy cane

Directions
1. Beat butter at medium speed with an electric mixer until creamy; add sugar, beating until light and fluffy. Add egg and vanilla, and beat until blended.
2. Combine flour and baking soda. Add to butter mixture, beating at low speed until mixed well.
3. Divide dough into 2 equal portions. Roll 1 portion of dough into a 12- x 8-inch rectangle on a piece of lightly floured plastic wrap.
4. Knead the food coloring into the remaining portion of dough. Roll the red dough into a rectangle like in Step 3. Invert the plain dough onto the colored dough. Peel off plastic wrap.
5. Cut dough in half lengthwise, forming 2 rectangles. Roll up each rectangle starting at 1 long side, using bottom piece of plastic wrap as a guide. Wrap in plastic wrap, and freeze for 4 hours.
6. Preheat oven to 350 degrees F.
7. Cut dough into ¼ inch thick pieces, and place on parchment paper-lined baking sheets.
8. Bake for 10 to 12 minutes or until set. Cool cookies completely.
9. Sandwich with peppermint frosting.

For the peppermint frosting:
In a large mixing bowl, beat butter until smooth. Add the confectioner’s sugar and continue beating on low until combined. Mix in peppermint extract, milk, and crushed candy cane.


Thursday, December 15, 2011

Christmas Sugar Cookies


With just ten days until Christmas, the countdown has begun! Listening to B101’s nonstop festive music through the day, it really does feel like Christmas is around the corner. So begins the Christmas baking…

Christmas baking and the holiday season come hand in hand. It’s a great way to bond with family and friends, make fantastic edible presents, and an excuse to eat more sugar than normally acceptable. This time of the year, so many online recipe databases (like tastespotting.com) are covered with shades of white, red, and green that it’s hard to resist not trying a few recipes to experiment with.


These Christmas cookies were made with a simple sugar cookie dough, and then decorated with royal icing. In addition to being gracious noms, these cookies also make delectable Christmas tree ornaments. Simply poke a hole in the cookie before putting it in the oven and thread some tinsel or ribbon through. Hang it around the house and on the tree for a shortbread scent without the risk of burning your whole house down.

With the help of my two elves (thanks Jamie and Patty!) all the cookies turned out very festive indeed. If you so desire, you can even act out a scene with these cookies. Be careful though, once you make your food come to life, it’s difficult to let go of them. Especially when you give them names. Not saying I did or anything of course.

“It’s the most wonderful time of the year
There'll be much mistltoeing
And hearts will be glowing
When love ones are near
It's the most wonderful time of the year…”

Lalalalaaa

Ingredients

3/4 cup butter, softened
1 cup sugar
1 tsp vanilla extract
2 eggs
2-3/4 cups all-purpose flour
1 tsp baking powder

For the royal icing:1 egg white
½ tsp lemon juice
1 ¾ cup confectioners sugar
Food coloring

Directions

1. Preheat oven to 375 degrees F.
2. Cream butter and sugar in a large bowl until light and fluffy. Beat in eggs and vanilla.
3. Combine the flour and baking powder, then add to creamed mixture and mix well.
4. On a lightly floured surface, roll out dough to ¼ inch thickness. Cut out with Christmas cookie cutters and transfer to lined baking sheets.
5. Bake for 8-10 minutes or until lightly browned. Cool completely on wire racks. Decorate cookies with royal icing.

For the icing:In a large mixing bowl, beat egg whites and lemon juice together, adding the powdered sugar until the mixture holds stiff peaks. Divide into bowls and add food coloring as desired.