Saturday, October 30, 2010

Red Velvet Cupcakes


Should I go trick or treating this year? With Halloween 2010 in just one day, I began pondering this question once again. While some would argue that as a senior in high school, I am too old for trick or treating, others would argue that you are never too old for trick or treating. I was surprised to hear that there are some towns set to fine kids over the age of 12 who TOT. I think that that law is simply absurd. Where is the Halloween spirit America? Halloween is not only a time to get free candy; it is a time to let the creativity of a child reignite to find only the “best Halloween costume ever.” (Of course, the free candy really is the biggest incentive for door hopping on a cold fall evening.)

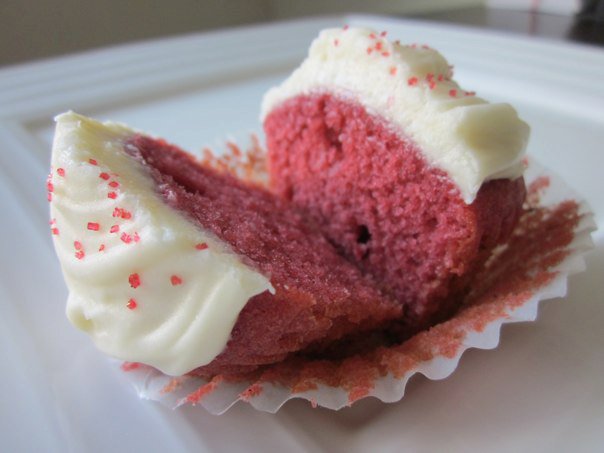
Along with Reese’s, Snickers, and Twix, dirt cake, almond witch fingers and other scary foods are a must on the menu for October 31st. I have wanted to make red velvet cupcakes for a while now, and with the intense red of the cupcakes and the gory colors of Halloween somewhat related, I finally had an excuse to do so.

At first, I could not understand the popularity of red velvet cake. Was it not simply vanilla cake dyed blood red with the help of food coloring? After some intense Googling, I discovered that red velvet cake is one of those desserts that carry much history with it. While most recipes now call for food coloring, the red color was originally created through the reaction between vinegar and buttermilk, which helped to reveal the anthocyanin pigment in the cocoa.


These cupcakes are far from healthy, especially with the cream cheese frosting. Maybe you could convince yourself of its nutritional benefits in that at least there is no butter, but rather heart-healthy oil. Try to slather on as little icing as possible (the cakes are delicious just as is). Remember though, that it is Halloween, and you have to allow yourself a treat now and then.
Trick or treat? I’ll take the treat thanks.

Ingredients

2 1/2 cups all-purpose flour
1 1/2 cups sugar
1 tsp baking soda
1 tsp cocoa powder
1 1/2 cups vegetable oil
1 cup buttermilk, room temperature
2 large eggs, room temperature
2 tbsp red food coloring
1 tsp white distilled vinegar
1 tsp vanilla extract

For the Cream Cheese Frosting:
1/2 pound cream cheese, softened
1 stick butter, softened
1 tsp vanilla extract
2 cups sifted confectioners' sugar

Directions

1. Preheat the oven to 350 degrees F. Line 2 (12-cup) muffin pans with cupcake papers.
In a medium mixing bowl, sift together the flour, sugar, baking soda, salt, and cocoa powder.
2. In a large bowl gently beat together the oil, buttermilk, eggs, food coloring, vinegar, and vanilla with an electric mixer. Add the sifted dry ingredients to the wet and mix until smooth and thoroughly combined.
3. Divide the batter evenly among the cupcake tins about 2/3 filled. Bake in oven for about 20 to 22 minutes, turning the pans once, half way through. Test the cupcakes with a toothpick for doneness. Remove from oven and cool completely before frosting
4. For the Cream Cheese Frosting:
In a large mixing bowl, beat the cream cheese, butter and vanilla together until smooth. Add the sugar and on low speed, beat until incorporated. Increase the speed to high and mix until very light and fluffy.


Friday, October 29, 2010

Pumpkin Overload: Cookies and Biscotti


Walking through piles of fallen leaves every morning to school, I realize that fall has suddenly come. The arrival of autumn means Halloween, Thanksgiving, and of course, an abundance of pumpkins. While pumpkins are great for carving and decorating the house for the spooky season, they are also great for making into delicious cookies. When I think of fall food, I think of comfort food, and when I think of comfort food, I think of pumpkins. The smooth texture and slight sweetness of the bright orange flesh allures my taste buds. I have always loved pumpkins and could eat them simply steamed, boiled, or microwaved. However, I do enjoy exploring new ways to cook my favorite foods.

After flipping through my October issue of Cooking Light for some fall inspirations, I decided on whipping up two takes of pumpkin cookies: the American kind, and the Italian kind. The American kind, or simply, pumpkin cookies, are what you would expect pumpkin cookies to be like. They are moist, aromatic, and scrumptious. While the texture is more like a cake’s than a cookie’s, they hit the spot just as good, if not better, than your old chocolate chip cookies. The Italian kind is biscotti-- a hard biscuit that is great dipped in coffee or simply gnawed on.

Did I mention that pumpkin is super healthy too? Yes, in fact, it’s healthy enough (and super enough) to be deemed a superfood—a scientific term for food that are particularly good for you since they provide many healthy nutrients. Pumpkins are a strong contender against carrots for their powerful protection of vision due to their bright orange colors. Getting your daily need of fiber without digging out the cardboard is easy with pumpkin in your diet. Pumpkin is also extremely low in calories; one cup of cooked pumpkin has the same number of calories as two Dum Dum Pops. Now you know what you should be giving out this Halloween…

With just two days until Halloween, it’s time to carve pumpkins, eat pumpkins, and have pumpkin parties. The spooky time of year is finally here so make these pumpkin goodies for your family, friends, and of course, yourself!

Pumpkin Cookies

Ingredients

2 cups all purpose flour
1 1/4 tsp baking powder
1 tsp baking soda
1 tsp ground cinnamon
1/4 tsp ground ginger
1/8 tsp ground cloves
2 large eggs
1 cup light brown sugar
1/2 cup oil
1 tsp vanilla extract
1 cup canned pumpkin puree

Directions

1. Preheat oven to 325 degrees F and place oven rack in the center of the oven. Line two baking sheets with parchment paper.
2. In a large bowl, sift or whisk together the flour, baking powder, baking soda, ground cinnamon, ground ginger, and ground cloves.
3. In the bowl of your electric mixer, or with a hand mixer, beat the eggs and sugar until light and smooth (about 2 minutes). Beat in the oil, vanilla extract, and pumpkin puree. Add the flour mixture and beat until incorporated. Using a tablespoon, place small mounds of batter onto the prepared baking sheet, spacing about 2 inches (5 cm) apart.
4. Bake for about 15 - 18 minutes or until a toothpick inserted in the center of a cookie comes out clean. Remove from oven and transfer to a wire rack to cool completely before frosting.


Pumpkin Biscotti

Ingredients

2 1/2 cups flour
1 cup sugar
1 tsp baking powder
1 tsp of cinnamon
1/2 tsp of nutmeg
Pinch of ginger
Pinch of cloves
2 eggs
1/2 cup of pumpkin puree
1 tsp of vanilla extract

Directions

1. Preheat oven to 350°F. Sift together the flour, sugar, baking powder, and spices into a large bowl.
2. In another bowl, whisk together the eggs, pumpkin puree, and vanilla extract. Pour the pumpkin mixture into the flour mixture. Give it a rough stir to generally incorporate the ingredients, the dough will be crumbly.
3. Flour your hands and a clean kitchen surface and lightly knead the dough. Lightly grease a baking sheet or line it with parchment paper. Form the dough into two logs. The loaves should be relatively flat, only about 1/2 inch high. Bake for 20-25 minutes, until the center is firm to the touch.
4. Let biscotti cool for 15 minutes and then using a serrated knife cut into 1 inch wide pieces. Turn the oven to 300 F and bake for an additional 15-20 minutes. Cool completely.


Friday, October 15, 2010

Persimmon and Date Scones


Growing up in a commonwealth country, I lived on scones and jam. The scones in America are very different to the scones I had in New Zealand. I’ve found that US scones are much sweeter and denser than their NZ counterparts. Craving scones this afternoon, I dug out the Edmunds cookbook—a staple in the Kiwi’s kitchen.

I decided to add an Asian twist to the basic scone dough recipe I found in my beloved cookbook. My mom and I went to H-Mart the other night and were delighted to find persimmon pancakes in the grocery aisle. While the literal translation of this food is persimmon pancakes, they are more like dried persimmons. My mom talked much about them, reminiscing back to when she had them as a child in China. I was excited to try one of these mysterious flat rounds. It was white on the outside from edible mold, and orange, sweet, and sticky on the inside. I really enjoyed the flavor of these persimmon pancakes.

The addition of dried persimmon and dates to the plain scone recipe livens up the dough significantly. The texture and sweetness from the fruits makes the scone more exciting to bite into. You never know what you might get with each mouthful. You could get a date, a chunk of persimmon, or if you’re lucky, both…

Ingredients

3 cups flour
6 tsp baking powder
1 tbsp sugar
1/3 cup trans fat free margarine
½ cup chopped dates
2 dried persimmons, chopped into small cubes
1-1 1/2 cups Milk

Directions

1. Preheat the oven to 420 degrees F.
2. Sift flour, baking powder and sugar into a bowl. Rub margarine into the flour mixture until it resembles fine breadcrumbs. Stir in the chopped dates and dried persimmons. Add milk and mix quickly with a knife to form a soft dough. Knead a few times.
3. Divide the dough into two. Take each mound and form a flat circle approximately 1 inch high on a dusted surface. Using a sharp knife cut the dough into eight even sized pieces, like you would a cake.
4. Carefully transfer the dough onto a lined and greased oven tray leaving enough space between scones for rising. Brush the tops with milk. Bake in the oven for 12 minutes or until golden brown.


Tuesday, October 12, 2010

Peanut Butter Cookies


I’ve been eating way too much peanut butter in the past few weeks. Its smoothness, along with the surprise crunch now and then is simply irresistible. There’s simply nothing stopping me just dipping a spoon (or my finger) into the jar and pulling out the golden goodness inside.

Honey Bunches of Oats is another addiction I’ve recently adopted. In fact, my addiction is so bad that I had the cereal for breakfast, lunch, and afternoon tea all in one day. Yesterday, I had three bowls of it just for afternoon snack. I just discovered their strawberry flavor and it is SO GOOD. I could talk about it all day.

But we’re here to talk peanuts, so let’s get on with it.

Today was my friend’s birthday (Happy 18th Rebecca!) and she received some peanut butter cookies with Hershey’s Kisses on top. As soon as I savored the sweet, moist, and aromatic cookie (I ripped the Kiss off the top to maintain my new year’s resolution) I fell in love. At that moment, I knew that I just had to make my own batch that afternoon. There’s no recipe that uses up peanut butter quicker than peanut butter cookies. For just one batch of these, half a jar of crushed nuts must be sacrificed. For course, there’s no denying that they are 100% worth it.

These cookies are incredibly rich so make sure you had a glass of cold milk by your side. Remember, calcium is your friend! The batch I made this afternoon will be for my peers at school tomorrow. I sure hope they enjoy them as much as I did!


Ingredients

3/4 cup trans fat free margarine
1/2 cup light brown sugar
1/2 cup white sugar
1 large egg
1 teaspoon pure vanilla extract
3/4 cup crunchy peanut butter
2 cups all purpose flour
1/2 teaspoon baking soda
1/4 teaspoon salt

Directions

1. Preheat oven to 350 degrees F. Line two baking sheets with parchment paper.
2. In a large bowl, beat the butter and sugars until light and fluffy. Beat in the peanut butter. Add the egg and vanilla extract and beat to combine. In a separate bowl whisk together the flour, baking soda, and salt. Add to the peanut butter mixture and beat until incorporated.
3. Roll the batter into 1 inch balls. Transfer the cookies to the prepared baking sheet, placing about 2 inches apart. Then, using the tines of the fork that has been dipped in white granulated sugar, make a crisscross pattern. You could also use the bottom of a cup to flatten them and etch in smiley faces.
4. Bake the cookies for about 10 to 12 minutes, or until the cookies are lightly browned around the edges. Remove from oven and place on a wire rack to cool.


Tuesday, October 5, 2010

Spinach and blueberry salad with walnuts


This year I am features editor of my school's student newspaper- The Merionite. Being part of the features crew is great because our section encourages articles on essentially anything that people find interesting. I will be having a monthly nutrition column, giving tips on healthy eating with a different theme each time. For the September issue I wrote about foods that can make you smarter.

Nourish Your Mind, While Nourishing Your Body

The last vestiges of summer are suddenly fading and with another year of school to look forward to, it’s time to start sharpening that brain of yours. This year, like all other years, you promised yourself to try extra hard in school and get those desirable grades. Of course, studying extra hours at night can help improve your grades, but did you know that there are actually certain foods that are proven to improve your intelligence? Yes, many studies show that some foods help brain cells communicate, improve memory, and increase brain health. Obviously this doesn’t mean that you can simply indulge in these foods and forget about studying, but it does mean that there may be an additional way to help you achieve your best this year. So get yourself back on track with the following brain foods that are sure to power your mushy grey matter through the next nine months.

Coffee
The coffee bean is full of healthy antioxidants, amino acids, vitamins and minerals. Coffee’s caffeine is also vital to its protective affects.

Chocolate
We’ve all heard about the benefits of dark chocolate, yet we still feel guilty while eating it as it is still labeled as a “treat” food. Now it seems that chocolate is related to improving memory. This does not mean that you can hit the vending machine and just grab a Snickers Bar whenever; however, it does mean that occasional chocolate sessions are fine, and potentially beneficial.

Blueberries
You’ll be thankful of your love for these dark rounds when you hear of the mighty benefits they provide. Blueberries are arguably the best brain food and are shown to improve learning ability. In addition, they are one of the most powerful anti-stress foods. Try to avoid sweetened dried blueberries and opt for the fresh ones!

Walnuts
How could a nut that actually looks like a brain not provide you with brainpower? The healing power of walnuts is primarily due to their high concentration of omega-3 fats. These are the very fats that make up 60% of your brain (yes, you have a fat brain!).

Avocado
The monounsaturated fat in avocados promotes increased circulation and blood flow. Eating lots of avocado can also lower blood pressure levels, which is known to benefit the brain. Lower blood pressure may increase cognition and I.Q.

Apples
Here’s another reason to eat an apple a day: Apples are a great source of an antioxidant that protects your brain cells. Make sure to eat your apples with skin as that is where most of the antioxidants are found- it’s also a delicious and easy way to add fiber to your diet.

Note: “Although these foods are important to include in your diet to boost brain function, don't forget the importance of having an overall well balanced diet every day" (Tara Simpson, Registered Dietitian and Director of Client Care of Nutritional Health Systems).

To get a healthy dose of these brain foods, try tossing them into a salad. It’s an easy and delicious way to incorporate these foods into your diet. Don’t be afraid to experiment! Why not toss a few chocolate chips into your bowl? After all, they enhance brain function right?

Rainbow Salad

Ingredients

Raspberry vinaigrette salad dressing
2 tablespoons vegetable oil
2 tablespoons raspberry wine vinegar
2 tablespoons white sugar
1/2 teaspoon Dijon mustard
1/8 teaspoon dried oregano
1/8 teaspoon ground black pepper

1 (10 ounce) package baby spinach
1 Granny Smith apple, sliced thin
1 pint fresh blueberries
1/4 cup walnuts

Directions

1. Mix all the dressing ingredients in a small bowl.
2. In a large bowl, toss the spinach and sliced apple with the raspberry vinaigrette. Scatter the blueberries and walnuts over the top and serve.