Friday, August 27, 2010

Sushi


If you’re wandering around the food court at your local mall in search of a lunch that won’t leave you feeling like you just swallowed mouthfuls of butter, sushi is the best way to go. It’s light, healthy, and most importantly, delicious. Is there anything better than buying sushi in the midst of a fast food court? Of course there is- making your own sushi at home! Sushi making is not for Japanese people only. Anyone can make sushi if he or she has the right equipment and ingredients.

Sushi has become a universal icon of Japanese cuisine. When we think of Japanese food, we instinctively think of sushi. It’s like sweet and sour chicken from China, butter chicken from India, or spaghetti Bolognese from Italy. The sushi in Japan is quite different from the sushi we see (and taste!) here in the United States, but this is expected, as Americans have very different taste buds to those of their Asian friends.

Making your own sushi is like arts and crafts (isn’t all cooking though?). You really can put anything your heart desires on the layer of seaweed and rice. When you cut the resulting sushi roll into pieces and face them up on a plate, well, it’s like when you finish that last layer of paint and step back to admire your masterpiece.


For even healthier sushi, try substituting the white rice with brown rice or even experimenting with black rice. Many vegan sushis have black rice for some reason, but I mean it’s not like white rice isn’t vegan or anything. Make sure to put lots of veggies in your sushi! This is where you can get the crunch, as well as vitamins and minerals. Bring out the bamboo, bring out the chopsticks, and of course, bring out the wasabi!

Ingredients

2/3 cup uncooked short-grain white rice
3 tablespoons rice vinegar
3 tablespoons white sugar
1 1/2 teaspoons salt
4 sheets nori seaweed sheets
Vegetable sticks (I used carrots, cucumber, and celery)
Avocado, cut into strips
Meat, cut into strips (I used grilled chicken)
Wasabi
Pickled ginger

Directions

1. In a medium saucepan, bring 1 1/3 cups water to a boil. Add rice, and stir. Reduce heat, cover, and simmer for 20 minutes (alternatively, prepare the rice in a rice cooker).
2. In a small bowl, mix the rice vinegar, sugar, and salt. Blend the mixture into the rice.
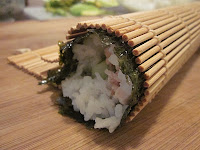
3. Place one sheet nori on a bamboo sushi mat. Spread a thin layer of rice on the sheet of seaweed and press into a thin layer. Arrange your fillings in a line down the center of the rice. Lift one end of the mat, and gently roll it over the ingredients, pressing gently. Roll it forward to make a complete roll.
4. Cut each roll into 8 slices using a wet, sharp knife.
5. Repeat step 3 with the remaining ingredients. Serve with soy sauce, ginger, and wasabi (if you’re up for the spicy kick!).


Monday, August 23, 2010

Cinnamon Rolls


A trip to the country side is a worthy journey now and again. Going through Lancaster County to Pennsylvania Dutch Country- otherwise known as where the Amish people-reminded me of the happiness gained from the simple pleasures in life. While my family and I waited for seats in a restaurant called Millers, we watched a video showing how “Stickies” are made. Looking at the product on the shelf, I concluded that Stickies are just what we would call cinnamon rolls. Cinnamon rolls have always been on my list of “foods to make when I have spare time,” and watching the video gave me the inspiration to finally make some.

To find the prefect recipe for cinnamon rolls, I had to do some research on the Internet. In the end, I found two recipes that I compiled into the one recipe below. I grabbed the recipe for the dough from one recipe and the recipe for the filling from the other. I then added my own recipe for the icing. The resulting recipe basically makes the healthiest (well at least the lowest fat) cinnamon rolls possible. The applesauce filling is unique and tastes surprisingly familiar- not like applesauce at all. In fact, it tastes just like the filling of a regular cinnamon roll. Going through the mall later this afternoon and smelling the heavenly aroma of Cinnabon rolls, I felt good that I had some fresh rolls waiting for me at home that did not cost me 730 calories, along with a higher chance of diabetes.


Ingredients

Rolls:
1 cup warm fat-free milk (100° F to 110° F)
1 tbsp melted trans-fat free margarine (such as I can’t believe It’s Not Butter)
2 tbsp oil
1/3 cup granulated sugar, divided
1 package quick-rise yeast (2 ¼ tsp)
3 ¾ all-purpose flour
1 large egg, lightly beaten
1/4 tsp salt
Cooking spray

Filling:
1/4 cup brown sugar, packed
2 1/2 tablespoons ground cinnamon
1/4 cup unsweetened applesauce
2 teaspoons honey

Icing:
1 cup icing sugar
1 tbsp water

Directions

1. Combine milk, 1 tablespoon melted margarine, 2 tablespoons oil, 1 tablespoon granulated sugar, and yeast in a large bowl; let stand 5 minutes. Add egg and remaining granulated sugar to bowl. Stir in 1 cup flour; let stand 10 minutes.
2. Add 2 1/2 cups flour and salt to milk mixture; stir until a soft dough forms (dough will be sticky). Turn out onto a lightly floured surface. Knead until smooth and elastic (about 6 minutes); add enough of remaining flour, 1 tablespoon at a time, to prevent dough from sticking to hands. Place dough in a large bowl coated with cooking spray; turn to coat top. Cover and let rise in a warm place, 35 minutes or until doubled in size. Punch dough down; cover and let rise 35 minutes or until doubled in size. Punch dough down; cover and let rest 5 minutes.
3. In a small bowl, combine brown sugar and cinnamon. In another bowl, mix together the honey and applesauce
4. Roll the dough into a 16×21 inch rectangle. Spread dough with applesauce mixture and sprinkle evenly with sugar and cinnamon mixture. Roll up dough and cut into 16 rolls. Place rolls, cut sides up, in a greased baking tray. Cover and let rise for 35minutes or until doubled size.
5. Preheat the oven to 350 degrees F.
Uncover rolls. Bake at 350 degrees F for 22 minutes or until lightly browned. Cool 10minutes in dishes on a wire rack. Turn rolls out onto wire rack; cool 5 minutes. Turn rolls over.
6. To make the icing, mix the icing sugar and water together to a smooth consistency. Spoon over rolls.


Friday, August 20, 2010

Fortune Cookies


As much as American Chinese restaurants like to make people think that fortune cookies are a part of Chinese culture, they are in fact almost unheard of in China. Fortune cookies really should be considered American culture, for Chinese food. Sometimes after eating in Chinatown, the waitress doesn’t even bother to give my Chinese family fortune cookies and my not-Chinese-born sister has to actually ask the waitress for one.

The actual cookie part of fortune cookies is quite bland; just a sweet hard (or crispy if you’re lucky) cookie. However, there’s something special about opening a cookie and reading a line that makes you feel good, or gives you hope and inspiration. Writing the fortunes on strips of paper is the most fun part of making these cookies. While all the fortune cookies in restaurants tell of good fortune (sometimes in questionable English), my sister and I decided to include some humorous fortunes in our cookies. After all, life isn’t just good luck after good luck; it’s a mixture of fortune and misfortune.

Some fortune cookie recipes ask for butter. They even stress that it cannot be replaced by any other ingredient and that it MUST be butter. Well, I disagree with that. You can make a fine fortune cookie without butter; like I did, and save yourself some saturated fat. In fact, if you use the recipe below to make fortune cookies, your cookies will not have a single milligram of fat. So be guilt free, crack some cookies, and eat up your blessings for a good life! (Just watch out for the cheeky one’s that my sister wrote)


Ingredients

1 egg white
1/8 tsp vanilla extract
1 pinch salt
1/4 cup all-purpose flour
1/4 cup white sugar

Directions

1. Preheat oven to 400 degrees F. Write fortunes on strips of paper about 4 inches long and 1/2 inch wide. Grease 2 cookie sheets.
2. Mix the egg white and vanilla until foamy but not stiff. Sift the flour, salt, and sugar and blend into the egg white mixture.
3. Place teaspoonfuls of the batter at least 4 inches apart on one of the prepared cookie sheets. Tilt the sheet to move the batter into round shapes about 3 inches in diameter. Be careful to make batter as round and even as possible. Do not make too many, because the cookie have to be really hot to form them and once they cool it is too late. Start with 2 or 3 to a sheet and see how many you can do.
4. Bake for 5 minutes or until cookie has turned a golden color 1/2 inch wide around the outer edge of the circle. The center will remain pale. While one sheet is baking, prepare the other.
5. Remove from oven and quickly move cookie with a wide spatula and place upside down on a wooden board. Quickly place the fortune on the cookie, close to the middle and fold the cookie in half.
6. Place the folded edge across the rim of a measuring cup and pull the pointed edges down, one on the inside of the cup and one on the outside. Place folded cookies into the cups of a muffin tin or egg carton to hold their shape until firm.


Monday, August 9, 2010

Chinese Red Bean Pastries


If you’ve ever been to Chinatown or are acquainted with Chinese cuisine, you’ll know that red bean paste is a prevalent element in Chinese desserts. Sweet bean paste is called Dou Sha in Chinese- Dou meaning bean and Sha meaning sand. The deep red color and dense texture might turn some people off, but then again, chocolate and coke don’t exactly look that enticing either. Red bean paste is actually quite delicious. I know that as a Chinese, I am biased (or at least my taste buds are), but what is there not to like about it? It’s simply mashed up red beans and sugar. In fact, I would consider it one of those famous food combinations. You know, like peanut butter and jelly, or strawberries and cream.

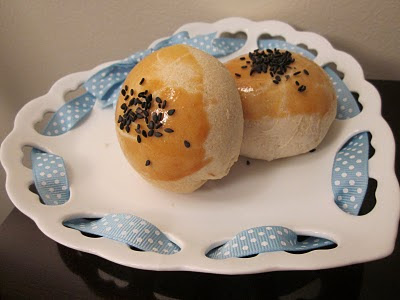
You can be creative with red bean paste and put it in many things like soup, bread, rice, and even pancakes. I decided to make some pastries with the supply that I made (you can also buy it in most Asian grocery stores). My mom’s colleague Mei came over and showed me how to make these pastries that she brought one time to a dinner party.
These dainty lil things are considered mooncakes in Taiwan, but as a Beijing-er, real mooncakes for me are the rich, dense cakes with a thin skin.

Making the pastry is the toughest part of the recipe. It’s very time consuming, but can be fun and relaxing if you put on some music and is totally worth it when you see the layers start to form as the two different doughs separate with heat. These pastries are delicate and so pretty, and are simply perfect for tea parties. Have one with a cup of green tea for an authentic Chinese treat.


Ingredients

Water dough
150g plain flour
50g oil
25g sugar
40g water

Oil dough
100g plain flour
40g oil

1 cup sweet red bean paste
1 egg yolk
Sesame seeds

Directions

1. Preheat the oven to 395 degrees F.
2. In a medium bowl, combine all the ingredients for the water dough. Mix and then kneed until the dough comes together. Let it rest for 20 minutes.
3. In another bowl, combine all the ingredients for the oil dough. Mix well until the oil and flour come together. Let it rest for 20 minutes.
4. Divide the water dough and oil dough each into 18 pieces so that you have 36 balls of dough.
5. Take one ball of the water dough and roll it out into a circle with a diameter of roughly 10cm. Put a round of oil dough into the center and enclose it with the water dough.
6. Push down on the resulting ball so that you have a flat circle. Using a rolling pin, roll the circle into an oval.
7. Using your hands, roll up the dough from one side like you would roll a Swiss roll. Turn the roll so that the longer length is perpendicular to your body.
8. Flatten the dough and roll it into an oblong again.
9. Repeat steps 7 and 8 three times. You should be able to see layers already starting to form.
10. Roll your final dough into a flat circle with a diameter of roughly 12cm. Put one tablespoon of red bean paste in the center and fold up the edges.
11. Shape the ball with your hands so that you have a slightly flattened ball. Repeat steps 5 through 9 until you have used up all the dough.
12. Put the pastries on a greased oven tray. Carefully brush the tops with egg yolk and sprinkle sesame seeds on top.
13. Bake for 20 minutes or until the pastries are golden brown and flaky.


Sunday, August 8, 2010

Peach Upside Down Cake


Now that summer is well under way, the summer fruits are finally available at Pick Your Owns. Picking your own fruit is so much fun. You get to sample all the fruit that are available while walking through orchards and you get to go home with a bushel of fresh fruit. My family and I went peach picking at Linvilla orchards in Media. It’s a great place to hang around and they have so many kinds of fresh produce – apples, grapes, tomatoes, peaches and more. Apparently they have 34 varieties of peaches, but to me, there were only two types- white peaches and yellow peaches. They also have rich and creamy home made ice cream. I heard that the graham slam is the best, but I guess I’ll decide for myself next year (when I can eat chocolate).

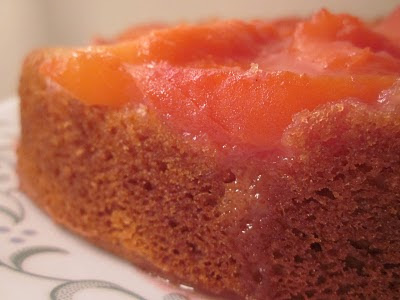
We left Linvilla with a whole box of fresh, juicy, ripe peaches. I cut up 5 peaches into slices and put them in the freezer so that I could use them later for smoothies. That left me with about 20 more peaches. When I have too many of one type of fruit I seem to always resort to baking. It’s an easy way to use up lots of fruit and it basically guarantees you a healthy dessert. Plus, there are many recipes that use fresh fruits and it’s not common to always have so much fruit available. So here was my chance to make this upside down peach cake that I’ve wanted to make when I had 1 ½ pounds of fresh peaches to spare.

Ingredients

3 cups thinly sliced peeled peaches (about 1 1/2 pounds)
1 tbsp sugar
1 tsp cornstarch
1 tsp lemon juice
Cooking spray
2/3 cup sugar
1/4 cup butter, softened
2 tsp grated lemon rind
1 tsp vanilla extract
1 large egg
11/4 cups all-purpose flour
1 tsp baking powder
1/2 tsp baking soda
3/4 cup low-fat buttermilk

Directions

1. Preheat the oven to 350 degrees F.
2. Combine the peaches, sugar, cornstarch, and lemon juice in a bowl. Spoon into a 9-inch round cake pan coated with cooking spray.
3. Place 2/3 cup sugar, butter, lemon rind, vanilla, and egg in a large bowl. Beat with a mixer at medium speed until well blended (for about 5 minutes).
4. Combine flour, baking powder, and baking soda, stirring well with a whisk. Add the flour mixture to sugar mixture alternately with buttermilk, beginning and ending with flour mixture; mix after each addition.
5. Spoon the batter over the peach mixture in pan. Bake for 45 minutes or until a wooden pick inserted in center comes out clean.


Carrot Cake


If you were to ask my friends to associate one vegetable with me, most of them would probably choose the carrot. I’m totally proud of this relation because I do love carrots very much. Not only are they crunchy, sweet, juicy, and every bit delicious, they are a vegetable along with all the health benefits veggies provide. Did you know that just one medium carrot has 200% of your daily requirements for vitamin A? Did you also know that carrots are a good source of Thiamin, Niacin, Vitamin B6, Folate, Fiber, Vitamin C, Vitamin K and many other nutrients? In fact, carrots are probably one of the healthiest foods you can really enjoy.

Carrots are most delectable eaten raw; however, if you are still a bit shy about munching on carrots like a bunny, why not hide them in a cake? Carrot cakes are a tasty proposition any time of the year, and for any occasion. To make you feel like you are actually consuming vegetables while indulging in this rich cake, let me tell you that there are THREE whole cups of carrots hidden in this cake. I think that’s pretty impressive.

Personally, I think that plain carrot cake without the icing is delicious, but I guess for some people, carrot cake just isn’t carrot cake without its cream cheese frosting. I mean seriously, how many people eat the cake just for an excuse to indulge in a whole quarter cup of icing? It’s true that the icing does turn the cake into something quite stunning. Doesn’t it look like snow resting on rooftops? Without the cream cheese frosting, it would just be a boring rooftop. And nobody likes a boring old rooftop now do they? Rudolph needs a soft landing because he’s no Bickey (my cat). Okay, this has gone a bit over the top (Over the ROOFtop that is) … how about a fun carrot fact to make my dryness all better? If you eat too many carrots your skin will actually start to turn orange! Now can finally get the healthy glow you’ve always wanted without risking your health… Hm. Alright, let’s just get on to the recipe…

Ingredients

4 eggs
1 1/4 cups vegetable oil
2 cups white sugar
2 tsp vanilla extract
2 cups all-purpose flour
2 tsp baking soda
2 tsp baking powder
2 tsp ground cinnamon
3 cups grated carrots
1 cup chopped walnuts

2 (8 ounce) packages cream cheese, softened
1/2 cup butter, softened
2 cups sifted confectioners' sugar
1 tsp vanilla extract

Directions

1. Preheat the oven to 350 degrees F.
2. In a large bowl, beat together the eggs, oil, white sugar and 2 tsp vanilla. Mix in flour, baking soda, baking powder, and cinnamon. Stir in carrots. Fold in walnuts. Pour into a greased pan.
3. Bake in the preheated oven for 40 to 50 minutes, or until a toothpick inserted into the center of the cake comes out clean. Let cool in pan for 10 minutes, then turn out onto a wire rack and cool completely.
4. For the cream cheese frosting, cream together the cream cheese and butter in a medium bowl until creamy. Mix in the vanilla, and then gradually stir in the confectioners' sugar. Refrigerate for 5 minutes before frosting the cooled cake. It’s vital that the cake is cooled completely to avoid a runny mess!


Tuesday, August 3, 2010

Avocado Bread


It’s not everyday you wonder what to do with a stash of avocado that’s slowly gathering dust in the fridge. It’s even more uncommon that you consider baking with them. After making some guacamole with one avocado and taking three days to finish it, I decided that there must be a quicker way to use up avocado. But of course: mash it up into a bread! People do it with ripe bananas and zucchinis all the time; using avocado must be no different. To my delight, I actually found avocado bread recipes on the Internet (well what can’t you find on the Internet these days huh?).


This quick bread has no oil or butter at all. The avocado eliminates the necessity to add any extra fat (apart from the fat in the eggs). The texture of this bread was perfect: soft, moist, and crumbly. It’s beautiful too, especially when you cut into the cake and unleash its fresh green color. This bread is not too sweet and would pair well with a cup of coffee. I expected the sugar to cover the flavor of the avocado, but you can definitely taste the creamy avocado in each bite.

Avocados are one of the best sources to get your good fats. It’s no wonder that articles on eating healthy fats are commonly accompanied by a picture of an avocado. They are full of healthy mono and poly unsaturated fats and contain very little saturated fat. In addition, avocados are a good source of fiber, Vitamin C, Vitamin K and Folate. Need I say any more for you to try this unique recipe?

Ingredients

2 cups all-purpose flour
3/4 cup sugar
1-1/2 tsp baking powder
1/2 tsp baking soda
1 large egg
1/2 cup mashed avocado (1 medium avocado)
1/2 cup buttermilk
1/2 cup chopped walnuts

Directions

1. Preheat the oven to 375 degrees F. Grease a 9 x 5-inch loaf pan.
2. Combine the flour, sugar, baking powder, and baking soda in a large mixing bowl. Whisk to blend thoroughly.
3. In a separate bowl, beat together the egg and avocado. Stir in the buttermilk.
4. Add to the dry ingredients and blend well. Stir in the pecans.
5. Pour into the prepared pan and bake for 50 minutes to 1 hour or until a wooden pick inserted in the center comes out clean.


Monday, August 2, 2010

Healthy Oatmeal Cookies

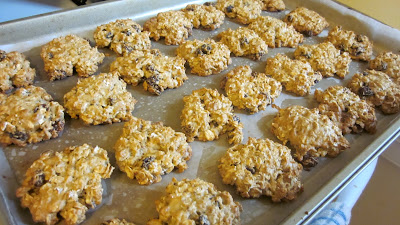
Freshly baked cookies are the perfect smell to lure guests into the house. Imagine warm oatmeal cookies dotted with sweet plump raisins, crispy on the outside, but moist and chewy on the inside. Ahh…

Me baking cookies is like my parents making rice (or my Grandpa boiling water). It’s something we do all the time, and have become so accustomed to that we simply do it without really thinking what goes in it. I’ve been on a search for a healthy oatmeal cookie for a long time (you know, how everyone’s always on that search for the “prefect” chocolate chip cookie recipe) and I think I’ve finally found what I’ve been looking for. This recipe from David Lebovitz’s blog really does meet my standards for taste, appearance, and nutrition. I adjusted the recipe ever so slightly to make it even healthier just because I really am that picky about healthy food. You can use refer to his recipe here.

Maybe these cookies shouldn’t exactly be called “healthy” oatmeal cookies, but they’re really as healthy as cookies can get. While they have a reasonable amount of sugar, they are actually low fat. To make you feel even better about eating them, they have a lot of oatmeal, which means fiber and all that wholegrain goodness!

These cookies will freeze very well. Once they are completely cooled, simply put them in a plastic container or zip lock bag and place in the freezer. When you need a quick fix to satisfy your sweet tooth, just grab one of these and pop it in the microwave for 30 seconds, or if you’re like me, just eat it straight from the freezer. It tastes perfectly fine I swear! In fact, I dare you to try one.

Ingredients

1 cup flour
1 tsp baking powder
1/2 tsp baking soda
2 tbsp trans fat-free margarine
1/2 cup granulated sugar
1/3 cup (packed) light brown sugar
1 large egg
1/4 cup unsweetened applesauce
1 tsp vanilla extract
1 1/2 cups old fashioned rolled oats
1/2 cup raisins (or dried cranberries)

Directions

1. Preheat the oven to 375 degrees F.
2. In a small bowl, whisk together the flour, baking powder, and baking soda.
3. In a large mixing bowl, beat the margarine and granulated sugar until smooth. Stir in the brown sugar, then the egg, applesauce, and vanilla.
4. Mix in the dry ingredients, then the oats and raisins.
5. Drop the batter by rounded tablespoons on the baking sheets and use a fork to gently flatten the dough.
6. Bake the cookies for 10 to 12 minutes or until they are golden brown.


Sunday, August 1, 2010

Roast Beef


Who says a girl can’t cook real meat? I’ve realized that the majority of my food blogging has been on sweet food, or food that you would expect a teenage girl to prepare, so I decided to draw out my roasting dish and carving knifes and cook a roast beef.

There are so many ways of creating a roast and everybody has their own way. It’s hard to say whose way is the best, when everybody claims that theirs is. I researched some cooking methods on the Internet and considered the comments of many people to create the following recipe. Feel free to adjust the recipe to your liking so that the succulent meat will satisfy your personal taste buds.

Ingredients

4 lb round roast of beef
2 Tbsp dried rosemary
salt
pepper

Directions

1. Preheat the oven to 350 degrees F.
2. Trim the cut of beef so that there is little visible fat. Cut into four equal pieces. Sprinkle liberally with salt and pepper.
3. Spray a hot skillet with oil and sear the beef for about 1 minute on each side.
4. Place the seared meat in a roasting dish and sprinkle the rosemary on top. Cover and bake for 45 minutes.
5. Uncover and bake for an additional hour or until the meat is cooked to your liking.